Bindings are the performance link between your boots and your skis. They hold your ski boots securely in place so you can control and transfer power to your skis. Bindings also allow your boots to release safely—whether during a fall or simply at the end of a day of skiing.
Many downhill skis include bindings to simplify your purchase. However, if you buy skis without bindings, this guide can help you narrow your options and choose bindings that match your skill level and skiing style. However, we don't recommend adjusting or installing your bindings on your own. Leave the task to a ski technician at your local ski shop, including at REI.
In this guide, we'll cover the basics of choosing downhill ski bindings, including:
- The basics of ski bindings
- Understand DIN settings
- Match your skill level
- Choose the right brake width
Read How to Choose Backcountry Ski Bindings for more information on ski bindings designed for alpine touring, or How to Choose Cross-Country Ski Gear for help with bindings for cross-country skiing.
Video: Downhill Skiing Bindings: How to Choose
Integrated Bindings
Skis with integrated bindings come with bindings pre-mounted. These systems typically include beginner skis to help simplify the buying process, or expert frontside skis for more precise power transmission. Kids’ downhill skis are often sold with bindings included too.
The Basics of Ski Bindings
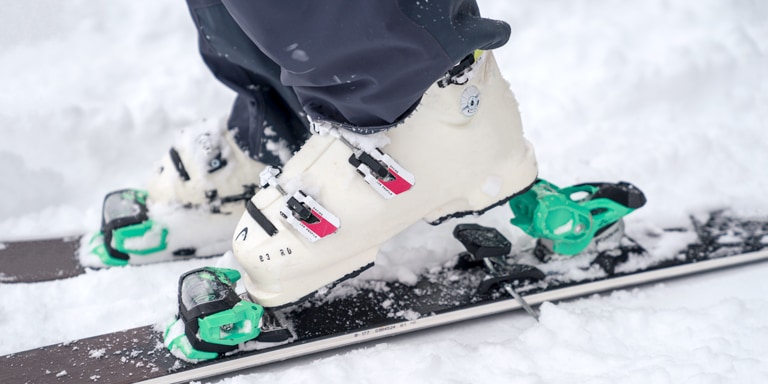
Bindings consist of several components:
- Toe piece: You step into this front piece to connect your boot to the ski.
- Heel: The back portion of the binding clicks when you step in, locking your heel in place. The brakes are located in the heel piece.
- Ski brakes: This safety feature prevents skis from sliding down the slope when you release your boots from the skis. When boots are in the bindings, the brake prongs line up with the sides of the skis, out of the way. When the binding releases, the prongs flip down and catch the snow to stop the ski from sliding away.
- Anti-friction devices (AFDs): These metal or Teflon® pads mount on the ski under the forefeet. They allow boots to slide easily out of the bindings when the toe pieces release.
- Lifter: This material under the binding is designed to boost edge hold. It's more of a race feature these days, enabling the number of actual edge angles before a skier "boots out" or has boot sides touching snow.
Understanding DIN Settings
Just as important as holding your boots in place, ski bindings also need to release at the right moment to prevent injury. These release settings are referred to as DIN (short for Deutsche Industrie Norm, German standards used in the ski industry for years). Some brands may use the ASTM (American Society for Testing and Standards) equivalents.
Downhill ski bindings come equipped with adjustable DIN settings and a DIN range (sometimes called a DIN scale). You can often find the lowest DIN value or the highest DIN value in the product specifications.
- Lower DIN setting: Allows the binding to release with much less pressure. If set too low, the boot could pop out of the binding unexpectedly.
- Higher DIN setting: Requires more force to be applied before the binding releases the boot. If the number is set too high, the boot may not release when needed, potentially causing injury.
The appropriate DIN setting for your bindings depends on your height, weight, age, skier type (ability) and boot sole length. Do not adjust your bindings or DIN on your own. Have a ski technician at your local ski shop calculate and set it for you. We recommend doing this at the start of each ski season or every 20 days of skiing.
Match Your Bindings to Your Skill Level
Choose ski bindings that match your skill level. Also check product specs for recommended skier weight.
- Beginner to intermediate models typically have a DIN range of 3 to 10. If you ski cautiously or moderately, you likely won't need the highest performance or most lightweight bindings. Affordable bindings with a DIN range up to 10 or 11 work for most recreational skiers. Examples: Salomon Strive 10 GW Ski Bindings or Marker Squire 10 Ski Bindings.
Advanced models typically have a DIN range up to 14, 15, or even 16. If you're a hard-charging, advanced skier, or heavier, you'll want a higher DIN range. You may be willing to pay more for beefier construction or performance metals like titanium to enhance skiing at high speeds and on steep terrain. Examples: Salomon Strive 14 GW Ski Bindings or Look Pivot 2.0 15 GripWalk Ski Bindings.
Juniors: Kids’ ski bindings have a much lower DIN range— typically with a high DIN of 7. While made to accommodate kid-specific boots, some work on adult sizes as well.
Pro tip: Brands often include the upper DIN value in the product name; for example, the Salomon Strive 12 GW Ski Bindings has a DIN scale of 4-12.
Choose the Brake Width
Once you've decided what DIN range works for you, make sure the brake width on the bindings fits the waist width of your skis. The brake width should be equal to or no more than 15mm wider than the ski waist.
For example, if you ski the Salomon QST 100 Cosmic Sky Skis, which has a waist width of 100 mm, you'll need a brake width of at least 100mm and no more than 115mm. Note: You can find the waist width of a ski in the product details, in the product name, or as the middle number when ski dimensions are presented in a three-number format like 134/100/122 (tip-waist-tail).
Mounting and Setting
Where exactly the binding is mounted on the ski affects performance. Most ski manufacturers recommend a mounting position, and a qualified ski shop such as REI Ski & Snowboard Shop will mount them as suggested. The farther back the binding is mounted, the stiffer and less "turny" the ski feels. Because women's center of gravity is farther back than men's, their bindings are often mounted slightly forward of center. Park and pipers also tend to prefer a forward mount.
Use and Care of Bindings
Tips on Getting into Your Bindings
- Stand on a level patch of snow. If you're on a slope, stand sideways to the fall line and put your downhill ski on first for balance.
- Use your ski pole to tap excess snow off of your boot soles.
- Align the boot toe with the toe piece and the boot heel with the heel piece and step down into the binding until it clicks in.
- To get out, push your ski pole down on the indentation on top of the heel piece until it springs open and lift your foot up and out.
Tips on Maintenance
- Have your skis tuned and bindings inspected by a ski technician before each ski season. Bindings can't be tuned and are maintenance free. They can only be adjusted for release settings and inspected/tested.
- Keep the AFD (anti-friction device) clean and replace it immediately if it gets damaged.
- Do not attempt to wash out your bindings at the end of the season, as this can remove the factory lube. Have a certified technician work on your bindings.
- Store your skis in a warm, dry place in the off-season.