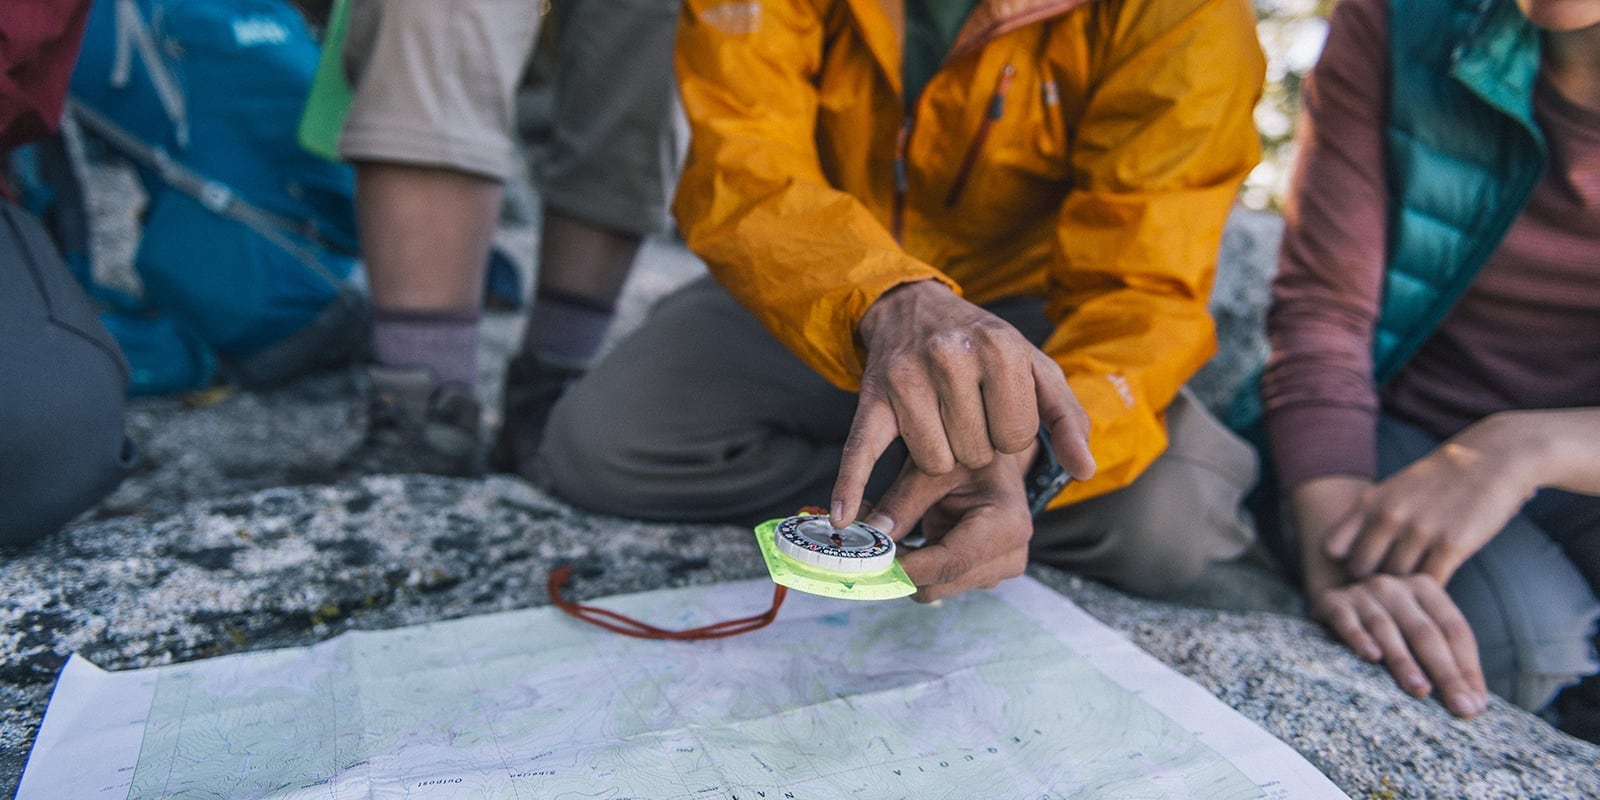
Finding your campsite, a spectacular viewpoint or your way back out of the wilderness won't always be simple tasks. That's why a magnetized compass and a paper map—and the navigational knowhow to use them—are part of the Ten Essentials.
This article covers the following concepts:
- Identifying the basic parts of a compass
- Understanding and setting declination adjustment
- Using your compass to orient your map
- Understanding bearings and how to use them
Also read our companion article, How to Use a Topo Map. Then take a class with the REI Outdoor School or another outdoor organization and practice these skills until you master them.
Why not rely exclusively on a phone or GPS receiver? Because batteries can die and gadgets can malfunction. A compass relies only on Earth's magnetic fields. If you don't have one yet, read How to Choose a Compass.
Video: How to Use a Compass
1. Get to Know the Parts of a Compass
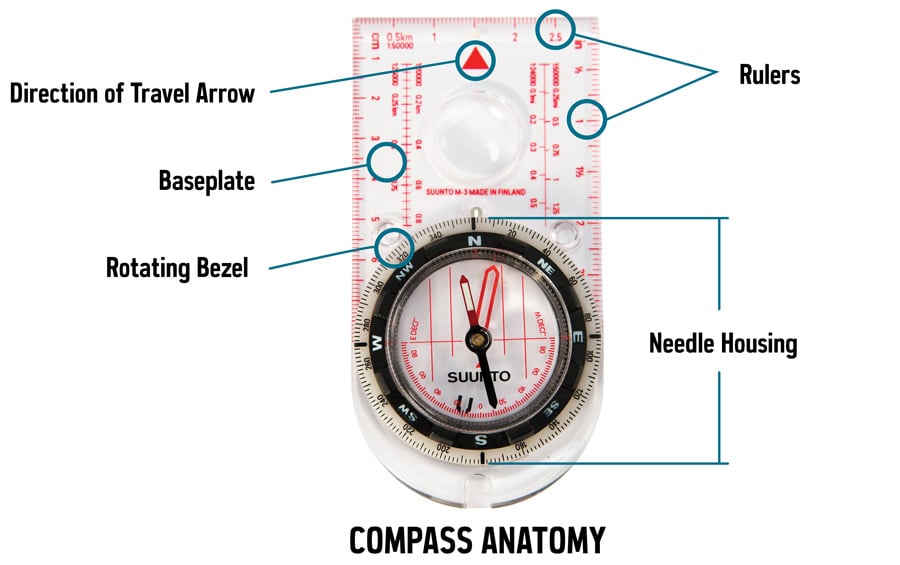
For this article, we're using a compass that has all of the features you need for basic navigation:
Baseplate: Clear, so you can see the map below it, it has at least one straight edge for taking bearings and transferring them to your map.
Ruler(s): Used with your map's scale to determine distances.
Direction-of-travel arrow: Tells you which direction to point the compass when you're taking or following a bearing.
Rotating bezel: Also called the "azimuth ring," this outer circle has 360 degree markings.
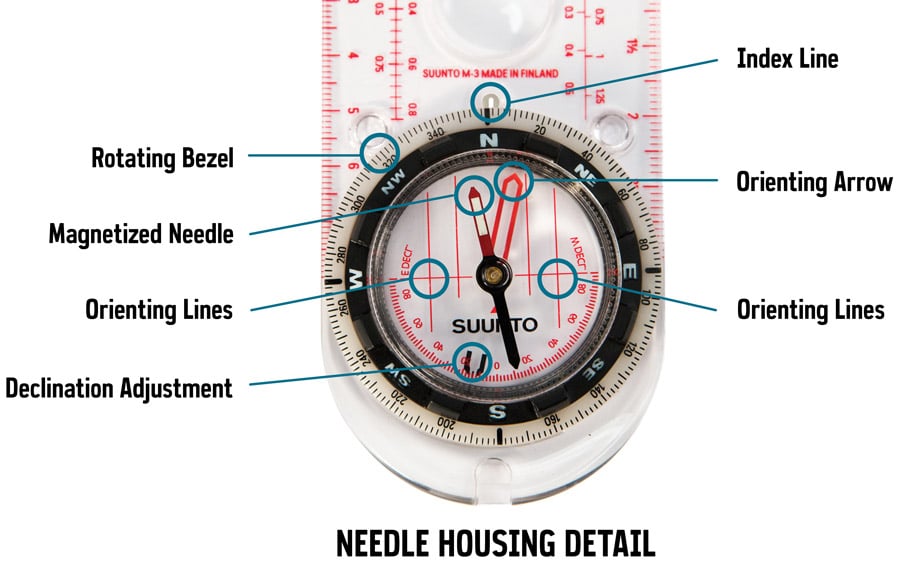
Index line: Located directly above the bezel, it's also called a "read bearing here" mark.
Magnetized needle: The end that always points to the magnetic pole is usually colored red or white.
Orienting arrow: Used to orient the bezel, it has an outline shaped to exactly fit the magnetized end of the needle.
Orienting lines: Parallel lines that rotate with the bezel; correctly aligning these with the north-south lines on a map aligns your orienting arrow with north.
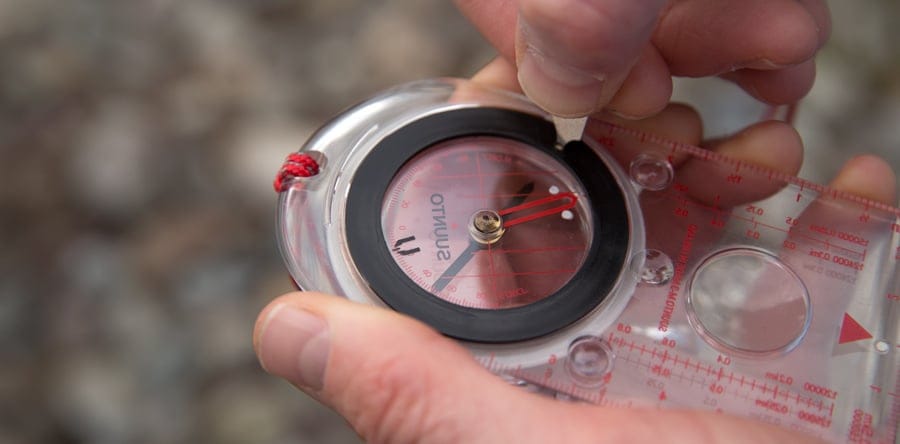
2. Adjust Declination
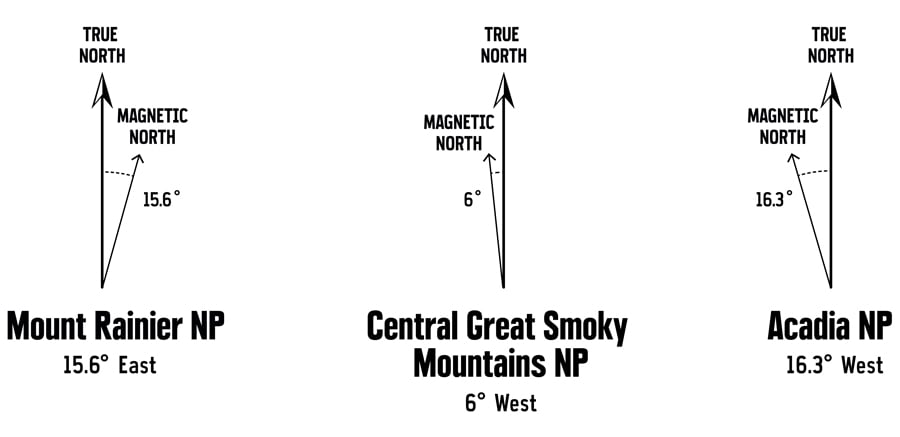
North on a map is easy to find (it's at the top). In most locations in the real world, though, magnetic north (where your needle points) and true north differ by a few degrees: That difference is known as "declination."
In the continental U.S., declinations vary from 20 degrees east in parts of Washington state to 20 degrees west in parts of Maine. Because a single degree of error can set you off course by 100 feet over a mile, it's important to accurately adjust for declination.
Before you can adjust for it, you have to find the declination value in your trip area. Topo maps list it, but the value varies over time. So check the map's revision date or, better yet, consult the National Oceanic and Atmospheric Administration (NOAA) magnetic declination.
The way you adjust for declination varies with different compass brands (some use a small tool) and you'll need to follow the provided instructions. Once the declination is set for a trip, you don't have to think about it again until you travel to a faraway place.
3. Orient Your Map
Map reading—correlating what you see on paper to what you see around you—is a foundational skill that you should practice early and often. Before you can do that, though, you have to have your map oriented correctly.
Once you've set your declination, map orientation is simple:
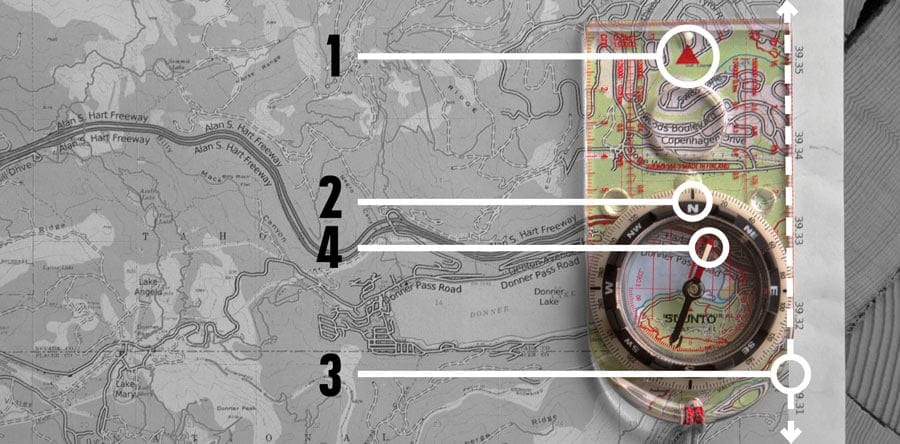
- Place your compass on the map with the direction of travel arrow pointing toward the top of the map.
- Rotate the bezel so that N (north) is lined up with the direction of travel arrow.
- Slide the baseplate until one of its straight edges aligns with either the left or right edge of your map. (The direction of travel arrow should still be pointing toward the top of the map.)
- Then, while holding both map and compass steady, rotate your body until the end of the magnetic needle is within the outline of the orienting arrow.
Now you have the map oriented correctly and can identify nearby landmarks on it. Take time to become familiar with your map and surroundings before you head off. And keep reading your map along the way: Staying found is far easier than finding yourself after you're lost.
4. Take a Bearing
A "bearing" is simply a navigationally precise way to describe a direction. For example, instead of heading "northwest" to get to a campsite, you might follow a bearing of 315 degrees.
Bearings are always relative to a specific location. Following the same bearing from two different places will not get you to the same destination.
Taking a Bearing from a Map
You can use a bearing to get to a location any time you know where you are on a map:
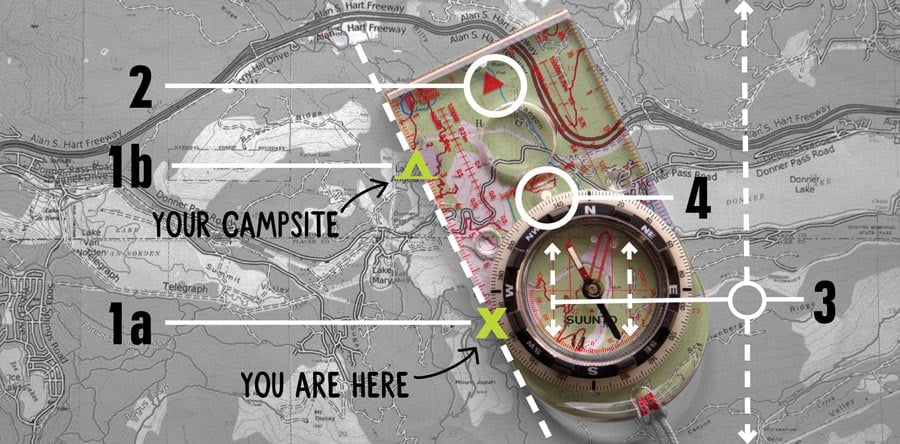
- Set your compass on the map so that the straight side of the baseplate lines up between your current position (1a) and the map location for a destination like a campsite (1b).
- Make sure the direction of travel arrow is pointing in the general direction of that campsite (in other words, it's not upside down).
- Now rotate the bezel until the orienting lines on the compass are aligned with the north-south grid lines and/or the left and right edges of your map. (Be sure the north marker on the bezel is pointing north on the map, not south.)
- Look at the index line to read the bearing you've just captured.
Now you can use the compass to follow that bearing to your destination:
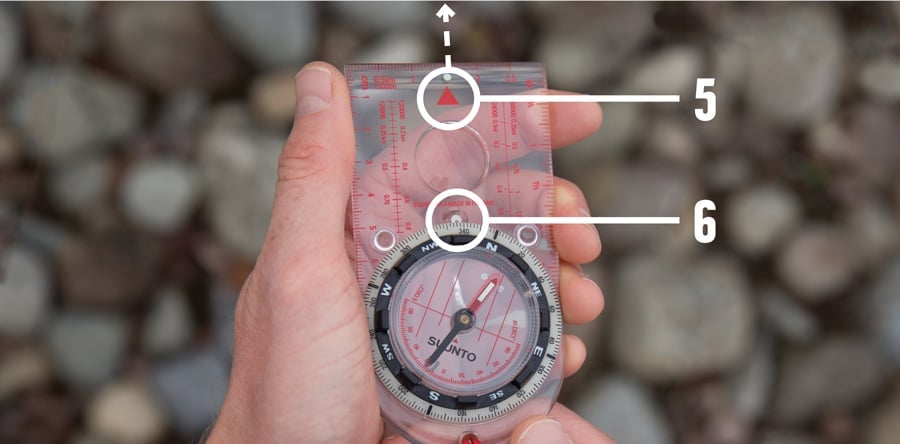
5. Hold the compass with the direction of travel arrow pointing away from you.
6. Rotate your body until the magnetized needle is inside the orienting arrow. The direction of travel arrow is now facing the bearing you captured and you can follow it to your destination.
Taking a Bearing in the Field
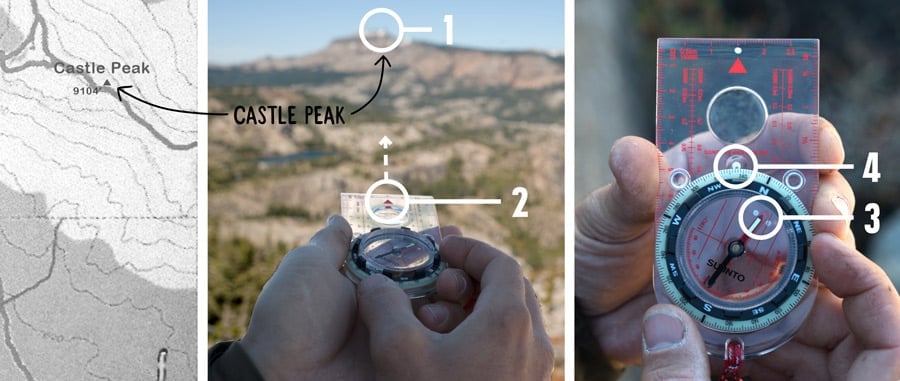
You can also use a bearing to find where you are on a map. You might want to know exactly where you are along a trail.
- Start by finding a landmark that you can also identify on your map.
- Hold your compass flat with the direction of travel arrow pointing away from you and directly at the landmark.
- Now rotate the bezel until the magnetized needle is inside the orienting arrow.
- Look at the index line to read the bearing you've just captured.
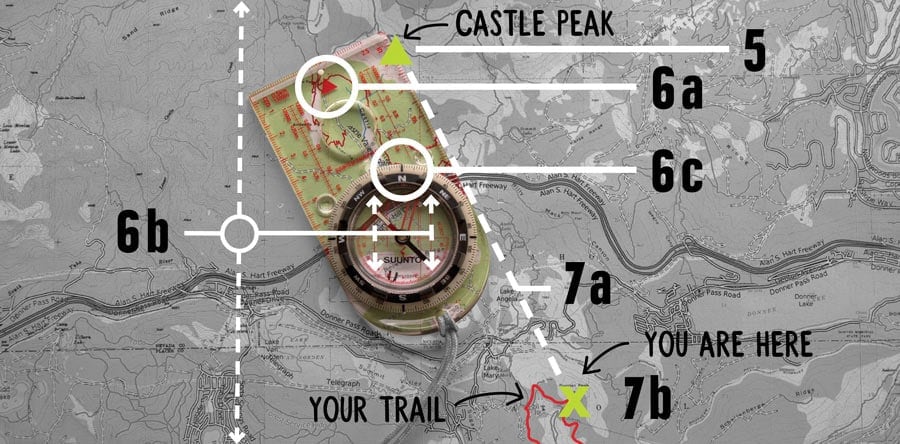
Now you can transfer that bearing to your map to find your location:
5. Lay your compass on the map and align one corner of the straight edge with the landmark.
6. Making sure that the direction of travel arrow remains pointed in the general direction of the landmark (6a), rotate the entire baseplate until the orienting lines are running north/south (6b) and the north marker on the bezel is pointing to north on the map (6c).
7. Now you can draw a line on the map along the straight edge of your compass (7a). The point where that line from the landmark crosses your trail is your location (7b).
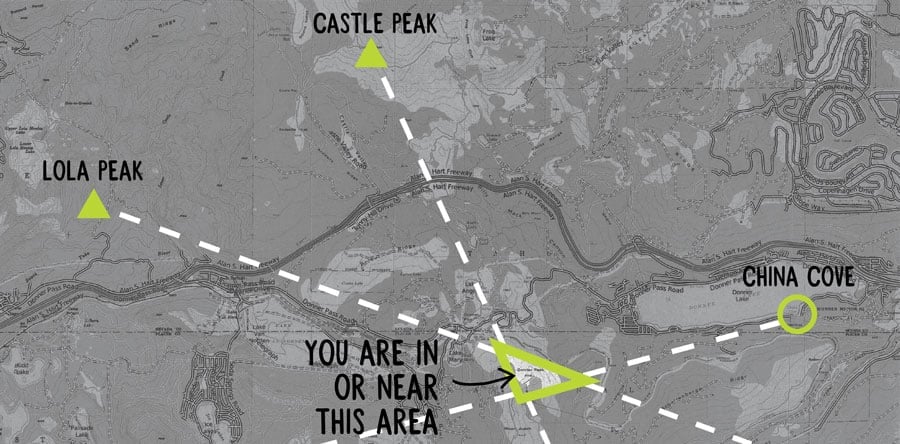
You can also use multiple bearings to find where you are on a map. If you aren't on a linear feature like a trail, you can still find where you are on a map. Called "triangulation," this process simply requires you to follow these same steps with a second and a third landmark, preferably ones that are at least 60 degrees away from your first landmark (and each other).
If the lines you draw meet at a single point, that's your location. Most of the time, though, the three lines will form a small triangle—your location will be somewhere in or near that small area. If the lines form a very large triangle, recheck your work because you have at least one significant error.
All maps courtesy of CalTopo.