The thrill of skiing untracked powder. Finding solitude in the outdoors in winter. Exploring remote mountain wilderness on your own two feet. Whatever reasons draw you into the backcountry in winter, it's important to know that if you head into snow-covered mountains, there's a risk of avalanches. With information and education, you can begin to identify where and why they occur in order to avoid them.
What is an avalanche? Avalanches can be big or small, wet or dry, but at their root, they're masses of snow moving down a slope. Avalanches can be deadly, and an average of 27 people die in U.S. avalanches each year, according to statistics kept by the Colorado Avalanche Information Center. Whether you ski, snowboard, snowshoe, hike, snowmobile or climb, anyone who spends time in snowy mountains can benefit from avalanche safety education.
Here's how to get started:
- Understand where and why avalanches occur: Learning this information will help you avoid avalanches when you recreate in snow-covered mountains.
- Check the avalanche forecast: A network of avalanche centers in the U.S. provides daily forecasts with detailed information about conditions to help you prepare for your trip.
- Carry rescue gear and know how to use it: It's best to avoid avalanches in the first place, but if things do go wrong, always have the proper rescue gear and know how to use it.
- Learn to recognize five red flags: Once outside, use your observational skills to recognize five key clues warning you about unstable snowpack.
- Take a class: At the very least, take an avalanche awareness course. Consider getting more formal training. Get the education that matches your goals and comfort level.
Remember: Safety is your responsibility. No internet article or video can replace proper instruction and experience—this article is intended solely as supplemental information. Be sure you're practiced in proper techniques and safety requirements before you engage in any outdoors activity.
Understand Where and Why Avalanches Occur
Learning where, when and why avalanches occur can help you gather information and make observations to minimize your chances of getting caught in a slide. For an avalanche to occur, you need three things to happen:
- Unstable snow
- Avalanche terrain
- A trigger—natural forces (such as wind) or human-induced (such as a person's weight traveling over weak snow)
Remove one of these three factors and the chance of an avalanche is none. For example, if you have unstable snow and you are the potential trigger, you can't have an avalanche if you're not in avalanche terrain. If the snow is unstable but you're in a flat or low-angle area (not in avalanche terrain), there's no risk of avalanches.
Use the following three questions as a guide to help you decide where and why an avalanche can occur:
1. Is the snow unstable and where is it unstable?
Unstable snow is snow that wants to or can slide downhill. Weather, precipitation, temperature, wind, sun and many other factors influence snowpack stability. While it takes more formal training and experience to understand and analyze snowpack conditions, there is one easy way to get this information: Read the avalanche forecast to find out whether the snow is unstable and where.
Avalanche forecasters and other professionals make field observations and analyze the snowpack and weather over the season to help you make decisions about when and where to go. These forecasts alert you to avalanche dangers and explain the types of problems you might expect.
For more details, see How to Read an Avalanche Forecast.
2. Am I in terrain where avalanches can occur?
Recognizing avalanche terrain (where they occur) is a key to traveling safely in the backcountry. Avalanche terrain is anywhere an avalanche can start, run or stop. Learn to recognize such terrain to help you plan a trip and pick a safe route.
Consider these factors when deciding whether you're in avalanche terrain:
- Steepness of the slope: A slope has to be steep enough for snow to slide. Most avalanche activity typically starts on slopes between 30 and 45 degrees. Some slides can happen on lower angles but they're not common. As you travel in the backcountry, ask yourself whether the slope is steep enough for snow to slide. It can be hard to estimate slope angle; a slope meter (inclinometer) is a useful tool to measure slope angle quickly. (Practice using a slope meter at a ski resort or elsewhere before traveling into the backcountry.)
- Connected slopes: Avalanche terrain is anywhere an avalanche can start, run and stop. If you're traveling in more gentle terrain but it's connected to steeper slopes above you that can slide, there's still a risk of an avalanche.
- Terrain traps: These are features like gullies, rocks, cliffs, trees or crevasses that can magnify the consequences of an avalanche. If you get caught in an avalanche, terrain traps will make even a small slide worse because they increase the risk of injuries or make it more challenging to dig someone out. A small slide can cause traumatic injuries if it barrels you into hard objects such as trees or rocks, sends you off a cliff, or buries you deeply in a gully or depression. Most people who die in avalanches do so from asphyxia (typically because they're unable to breathe when buried) or trauma.
For more on how to recognize avalanche terrain and how to find safer terrain, read Reducing Risks in Avalanche Terrain.
3. Can I trigger an avalanche?
The third factor needed for an avalanche to occur is a trigger. Natural triggers such as snow, wind or rain can cause avalanches. But most avalanche accidents are triggered by the subsequent victim or someone in the victim's group. A skier, snowboarder, snowshoer, snowmobiler, climber and others can all trigger avalanches (such as by moving their weight over unstable snow). So the decisions you make about when and where to go and how to travel can make a huge difference in preventing accidents. And despite a prevailing myth, you cannot trigger an avalanche by shouting or making loud noises.
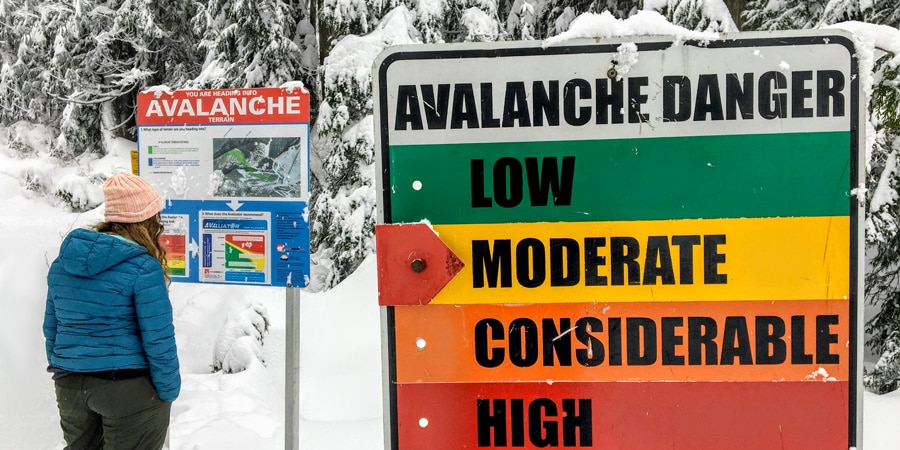
Check the Avalanche Forecast
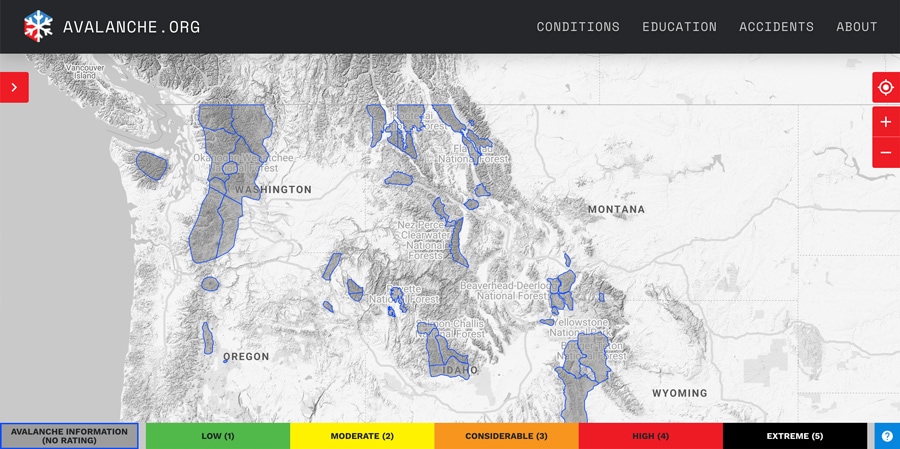
One of the most important things you can do before heading into the backcountry is to arm yourself with information about the weather and avalanche conditions. A network of regional backcountry avalanche centers in the U.S. provides daily avalanche forecasts for many mountainous regions to help people understand where avalanches may occur. Check the forecast daily because conditions constantly change.
Forecasters in the U.S. and Canada use a universal five-level warning system called the Avalanche Danger Scale; it lets recreationists know about the potential avalanche danger over a specific time period in certain mountain regions.
The forecast will tell you:
- the danger rating that day (low, moderate, considerable, high or extreme)
- the likelihood of avalanches
- the expected size and distribution of avalanches
- travel advice
Learn step-by-step instructions on How to Read an Avalanche Forecast.
Carry Avalanche Safety Gear and Know How to Use It
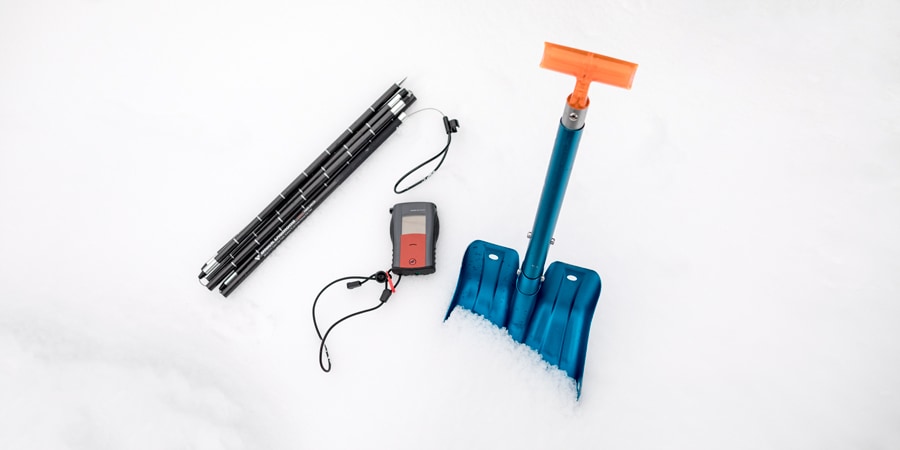
Since most avalanches are triggered by a person who ends up trapped or someone in the group, it's crucial that all members of your group carry essential avalanche rescue gear and know how to use it. If you or someone in your group is caught and fully buried in an avalanche, you have limited time to dig them out. You and your partners need to be well practiced at using your transceiver, probe and shovel. Having rescue gear, however, doesn't prevent you from getting caught in an avalanche nor does it mean you'll necessarily survive an avalanche.
Education, information and experience help you make good decisions to avoid being caught in an avalanche. If an avalanche happens, you should have essential rescue gear and know how to use it. But rescue should be considered a last-ditch effort.
At a minimum, each member of your group should have an avalanche transceiver, a probe and a shovel:
- Avalanche transceiver (also called rescue beacon): These small electronic devices transmit or receive electromagnetic signals, allowing you to locate a person who is buried. Each person in your group wears one and turns it on to transmit signals at the start of your trip. If someone gets buried, others in the group switch the beacon to "receive" mode to locate the signal of the trapped person.
- Snow probe: Once you've located a buried person's signal, you'll use a snow probe to pinpoint where and how deep they're buried. These collapsible, lightweight poles help you locate the buried person without wasting a lot of time digging in the wrong spot.
- Shovel: Digging out a buried person is time-consuming and hard. Lightweight snow shovels make it easier to move lots of snow.
For more detailed information, read our article on Avalanche Rescue Basics.
Recognize Five Red Flags
In addition to reading the daily avalanche forecast, once you're outside, keep your eyes open for avalanche red flags. These are the simplest and basic observations you can make to stay safe when traveling in the backcountry. Be on the lookout for visual and audible warning signs of elevated avalanche danger. When you see one of these red flags, it's nature's way of telling you that the snowpack is unstable and there's a real risk of an avalanche.
Here are five red flags of unstable snow:
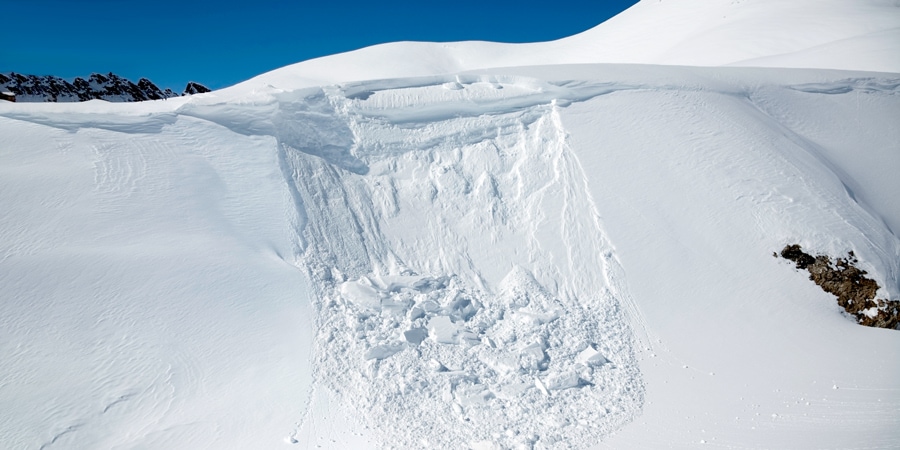
- Recent avalanches: If you see signs of recent avalanches or forecasters tell you there have been recent slides, it's a clear warning to avoid avalanche terrain. If you can't tell whether an avalanche was recent, assume that it was. One clear sign of a recent avalanche: if you see piles of chunky snow (avalanche debris). Or if you look up at the mountains, you'll see the vertical face (called the crown or fracture line) where the avalanche has pulled away from the snowpack.
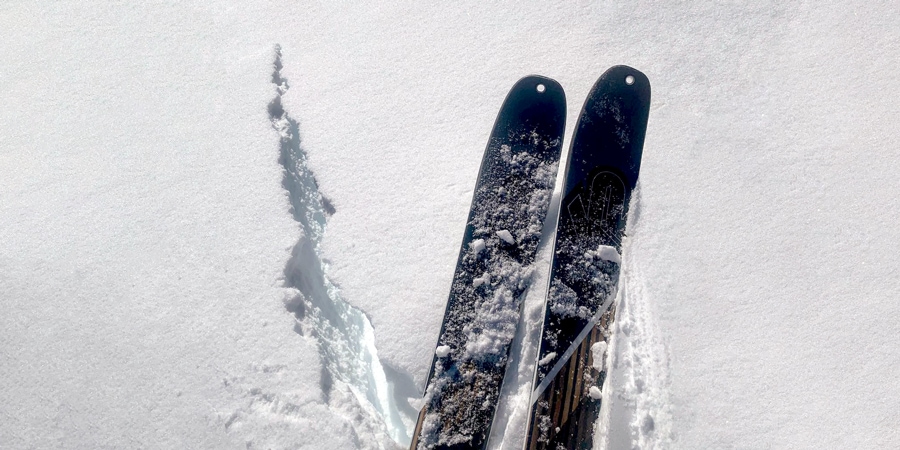
- Shooting cracks: When unstable snowpack collapses under a trigger, cracks may shoot across the snow surface and can sometimes run for tens or hundreds of feet.
- "Whumpfing": This is the loud noise you may hear when unstable snowpack collapses under you or your group. As the air rushes out of the snowpack, it goes "whumpf." (Yes, that's the technical term adopted by avalanche forecasters and educators). Where shooting cracks are the visual clues, whumpfing is the audible one. The two can happen at the same time.
- Big changes in weather: If you're experiencing big changes in weather, you should expect big problems.
- Recent rain or heavy snowfall means the conditions are there for unstable snow.
- Strong winds: Look for surface patterns on the snow made by strong winds, which could indicate that snow has been transported and deposited in dangerous drifts that can release and run. Pay attention to cornices and drifts on steep slopes.
- Rapid temperature change: Beware if you experience rapid melting, which can affect snowpack stability.
- Persistent slab avalanche: This is a type of avalanche that forms when a weak layer of snow is buried by other layers of snow. While most avalanches occur during or after a storm, persistent slabs can occur long after a storm has ended and are disproportionately responsible for avalanche fatalities.
Take an Avalanche Safety Class
This article provides you with a basic overview of avalanches. There are a lot of educational opportunities available to match your goals and comfort level.
Free in-person classes: At the very least, take a free or low-cost avalanche awareness class before contemplating a trip into the backcountry. REI and regional avalanche centers such as the Northwest Avalanche Center (NWAC) offer in-person talks.
Free one-hour online course: Consider taking Avalanche Aware, a one-hour, self-paced online program offered through a collaboration of the American Institute for Avalanche Research and Education (AIARE), the Colorado Avalanche Information Center (CAIC) and the NWAC.
More formal instruction: You may want more formal training. The American Avalanche Association, a nonprofit that sets the standards for avalanche education in the U.S., endorses a course progression for recreationists that starts with an avalanche awareness class and moves to more advanced courses that include hours in the field and classroom. Find course descriptions and course providers near you.
No matter what classes you take, consider avalanche education a lifelong learning process. There are lots of ways to continue your education: Read a book, watch an online tutorial, attend programs with your local avalanche center or hire a professional guide. If you haven't taken a class in a while, brush up on your reading or take a refresher avalanche course each winter. Practice rescue skills every chance you get.
Find an REI Avalanche Awareness Class